- Published on
Integrate a chatbot in your website using OpenAI
14 min read
- Authors
- Name
- Sameer Waseem
- Occupation
- Software Engineer

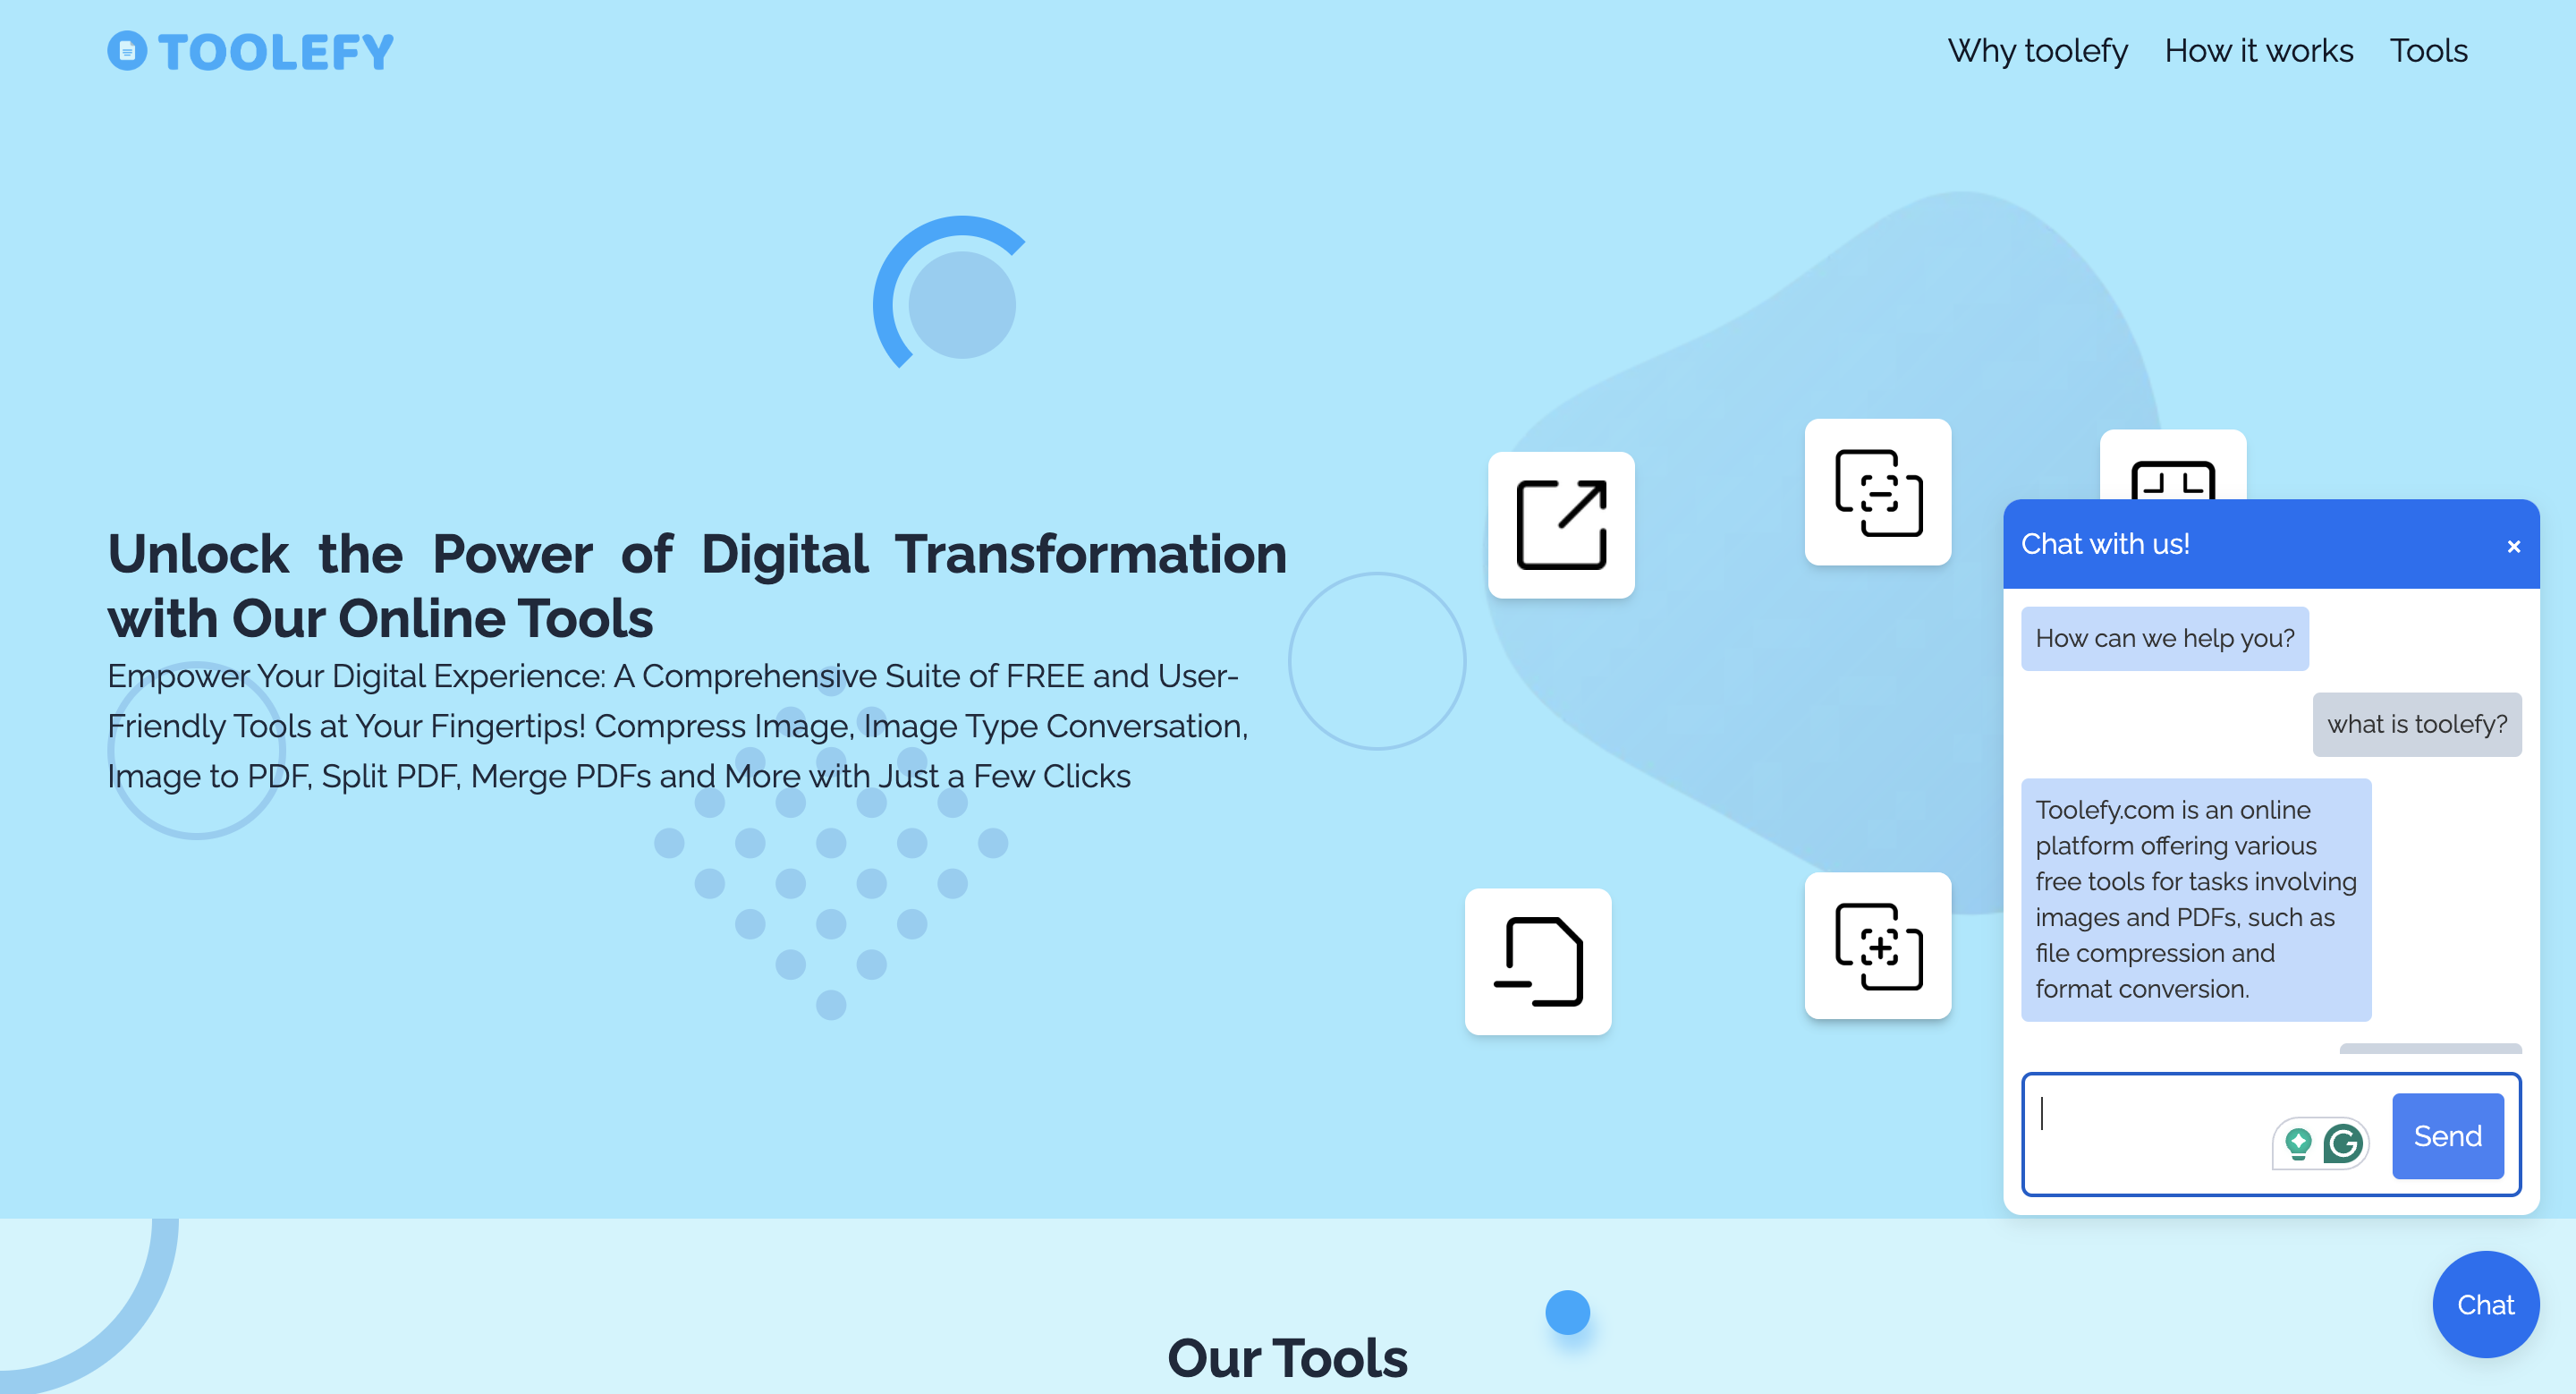
Table of Contents
Alright, let's get real for a second. It's 2024, and if you're a developer who doesn't know how to integrate a basic AI chatbot with ChatGPT, Gemini, or any other LLM, it's time for a serious self-reflection session. I mean, are you even a developer? How do you show your face in public? How do you even have a job? How are you still alive?! Okay, that's a bit much 😆, but let's dive into the absurd reality of the tech world today.
How to integrate a chatbot using OpenAI into your website
For this demo—or tutorial, or whatever we're calling it—I’ll be creating a chatbot for the incredibly useful and definitely bug-free website https://toolefy.com/ (a great tool to manage your PDFs—go use it, but only after you’ve finished reading this article). And if you find any bugs on the site, please direct your complaints to https://www.linkedin.com/in/abdul-wahab-dev0/ and not me. I’m just the innocent messenger here, armed with OpenAI and a sprinkle of prompt engineering magic.
Now, before we dive into the fascinating world of chatbot creation, here’s what you’ll need:
- Chai or coffee: Depending on your preference, or just maybe, maybe both?
- OpenAI key: If you’d rather save your money for more important things (like more chai or coffee), you can use Gemini by Google, which is free.
- A website: Um, yeah, If you don't have a website, you might want to create one. Or find a friend who has one (like me!). Your call.

For this demo, I’m integrating a chatbot in NextJS 14 with TypeScript. Let's start by installing the OpenAI npm package using the following npm command:
npm i openai
Afterward, depending on your folder structure, create a new file openai.ts or as you prefer. Here is what my folder structure looks like:

I just ended up creating an index file inside the OpenAI folder, which is inside the integration folder, which is inside the lib folder, which is at the root of my application 😵💫.
In index.ts, import OpenAI from OpenAI and initialize an OpenAI API client by using the OpenAI class like in the example below. Replace the openai_api_key with your valid OpenAI key.
import OpenAI from 'openai';

const openai = new OpenAI({
  apiKey: 'OPENAI_API_KEY',
});
Let’s create a chatWithWebsite function with OpenAI, which we can use to manage user chat, and export our function for use in other parts of the web as shown below:
'use server';

import OpenAI from 'openai';

const systemPrompt = `You are a helpful assistant called ToolefyBot.

You will only answer questions about website toolefy.com

About Toolefy:
Toolefy.com is an online platform offering a variety of free tools designed to simplify digital tasks,
particularly those involving images and PDFs. The site provides an array of utilities that can help
with file compression, format conversion, and document manipulation.

Some Things to keep in mind while replying to questions:
- Keep your answers within one line.
- Give on reference to other websites.
- If you don't know the answer to the question, just say "I don't know, Please contact support!"
- Do not format the response.`;

export const chatWithWebsite = async (question: string) => {
  try {
    const openai = new OpenAI({
      apiKey: process.env.OPENAI_API_KEY,
    });

    const response = await openai.chat.completions.create({
      model: 'gpt-4o',
      messages: [
        {
          role: 'user',
          content: systemPrompt,
        },
        {
          role: 'user',
          content: question,
        },
      ],
    });

    return response.choices[0].message.content;
  } catch (error) {
    console.log(error);
    throw new Error('Failed to get response from OpenAI');
  }
};
Okay, so a bit of a code explanation. What did I do and why did I do it? Using the OpenAI instance, I am calling the chat.completions.create function and passing it the desired OpenAI model I want to use. Here, I am using the latest model called gpt-4o. Afterward, I’m passing an array of message objects to the function as well. Now, more about the message object: the message object has two keys, role and content. Content is essentially the message you want to pass. The role has five possible values, but I’ll be only talking about three of them for now: ‘system’, ‘assistant’, and ‘user’.
system: Allows you to specify the way the model answers questions, basically where you tell the model how to behave and all.
user: Queries made by the user.
assistant: The model’s response.
I also include a prompt that will help OpenAI understand and follow some of my rules while replying to the users. After I get the response from OpenAI, I just extract it from the response object and return it.
Okay, our entire backend function for our chatbot is done. Now onto the UI for the website. Here is the code for that. It’s just UI, so not much to explain about it.
"use client";
import { useState } from "react";
import "./style.css";
import { chatWithWebsite } from "@/lib/integration/openai";
import { Questrial } from "next/font/google";
const ChatPopup = () => {
const [isOpen, setIsOpen] = useState(false);
const [isBotTyping, setIsBotTyping] = useState(false);
const [messages, setMessages] = useState([
{ role: "system", content: "How can we help you?" },
]);
const [input, setInput] = useState("");
const toggleChat = () => {
setIsOpen(!isOpen);
};
const handleSend = async () => {
if (input.trim()) {
const question = input;
setMessages([...messages, { role: "user", content: input }]);
setInput("");
setIsBotTyping(true);
const response = await chatWithWebsite(question);
setMessages((prevMessages) => [
...prevMessages,
{ role: "system", content: response as string },
]);
setIsBotTyping(false);
}
};
return (
<div className="chatPopup">
<button className="chatButton" onClick={toggleChat}>
Chat
</button>
{isOpen && (
<div className="chatWindow">
<div className="chatHeader">
<h3>Chat with us!</h3>
<button className="closeButton" onClick={toggleChat}>
×
</button>
</div>
<div className="chatBody">
<div className="chatMessages">
<div className="flex flex-col space-y-3 h-[80%]">
{messages.map((message, index) => (
<p
key={index}
className={`flex flex-col ${
message.role === "user"
? "self-end text-right bg-slate-300"
: "self-start bg-blue-200"
} p-2 rounded text-sm max-w-[70%]`}
>
{message.content}
</p>
))}
{isBotTyping && (
<div className="flex flex-col self-start p-2 rounded bg-blue-200 text-sm max-w-[70%]">
<span className="typing">Bot is typing...</span>
</div>
)}
</div>
</div>
<textarea
rows={2}
className="chatInput pr-[80px]"
value={input}
onChange={(e) => setInput(e.target.value)}
></textarea>
<button
className="bg-blue-500 p-3 text-white rounded shadow-sm absolute bottom-5 right-5"
onClick={handleSend}
>
Send
</button>
</div>
</div>
)}
</div>
);
};
export default ChatPopup;
Here I created a small popup for the website where people can interact with the chat and a few UI things as well.
.chatPopup {
  position: fixed;
  bottom: 20px;
  right: 20px;
  z-index: 1000;
}

.chatButton {
  background-color: #0070f3;
  color: white;
  border: none;
  border-radius: 50%;
  width: 60px;
  height: 60px;
  font-size: 15px;
  cursor: pointer;
  display: flex;
  align-items: center;
  justify-content: center;
  box-shadow: 0 4px 12px rgba(0, 0, 0, 0.1);
}

.chatWindow {
  position: fixed;
  bottom: 100px;
  right: 20px;
  width: 300px;
  height: 400px;
  background-color: white;
  border-radius: 10px;
  box-shadow: 0 4px 12px rgba(0, 0, 0, 0.1);
  display: flex;
  flex-direction: column;
}

.chatHeader {
  background-color: #0070f3;
  color: white;
  padding: 10px;
  display: flex;
  justify-content: space-between;
  align-items: center;
  border-top-left-radius: 10px;
  border-top-right-radius: 10px;
}

.closeButton {
  background: none;
  border: none;
  color: white;
  font-size: 20px;
  cursor: pointer;
}

.chatBody {
  padding: 10px;
  flex-grow: 1;
  display: flex;
  flex-direction: column;
  color: #333;
}

.chatMessages {
  height: 250px;
  overflow: scroll;
  margin-bottom: 10px;
}

.chatInput {
  border: 1px solid #ddd;
  border-radius: 5px;
  padding: 10px;
  resize: none;
  color: #333 !important;
}
Just the CSS used to style the popup. Nothing extra about it.
Below is a working demo of the chatbot on toolefy.com. The chatbot is not live, so you guys just get the demo:
A few things to keep in mind if you are creating a bot for your website: this is just a basic demonstration of how you can integrate a chatbot into your website. If you are actually going to integrate a chatbot, I’ll recommend doing more research about OpenAI on how you can best integrate it into your use case.
So, I guess that’s all, folks. This is how you can sort of create a basic chatbot for your website using ChatGPT.
Let me know if you have any further questions. I would be more than happy to answer them for you.